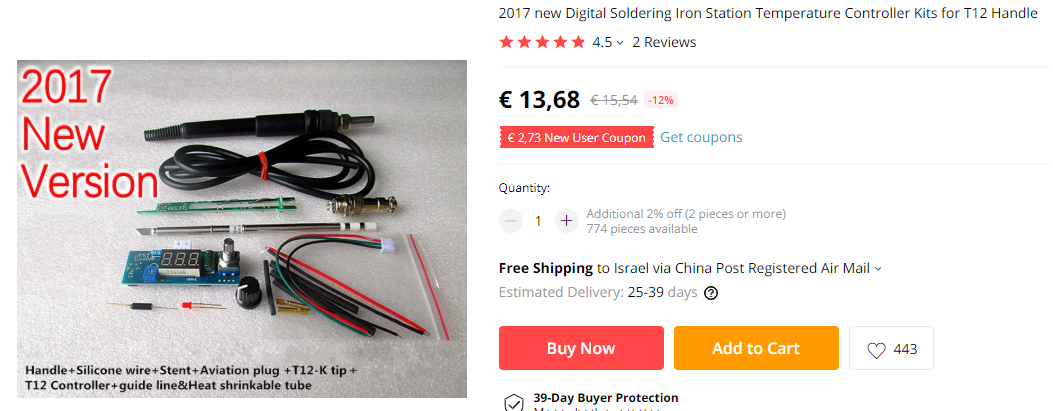
multi soldering station
laser cut box generated using benjolin case openscad script by stahl
take note
- in the laser folder at git you have a
dxffile for each face - we use the front.dxf for both front and back, and they represent the position of the controls

- when exporting the panel from inkscape
- make sure to save as DXF
- set the
base unittomm

- no splines or curves, make sure to break them before exporting

media


power supply
we currently use a 180W laptop power supply as it is slim and capable.
power chart for hakko T12

candidates
- “the 400W chinese one”
 bangood AC-DC 24V/17A 400W
- “the 180W laptop power supply”

- “the thin pro one”

- “the single head one”

single unit


Menu
(The default has been set, no special requirements, please do not set up a random)
Press and hold the encoder button does not move → start → enter the parameter settings mode:
There are 12 menus available for setup,P00,P01,P02,P03,P04,P05,P06,P07,P08,P09,P10,P11.
The digital display menu is 1.5 seconds,and then automatically displays the corresponding parameters of this menu,at the same time rotate left encoder is reduced,right is increase,Press it and automatically save the currently set parameters. And then display the next menu for 1.5 seconds, and then display the corresponding parameters of this menu, and so on. When all parameters are set to automatically enter the normal heating mode.
Because each set a parameter to save once, so you can shut down at any time without having to set all the parameters (such as you just want to set P01, set P01 after you can shut down and then boot into normal mode)
Menu item:
- P00: restore the default parameters (0 or 1, the default value of 0,0 for not recovering, 1 for the recovery)
- P01: Operational amplifier gain (200 to 350 times, step 1, default 230)
- P02: Operational amplifier offset voltage (0 ~ 250mV, step 2, the default value of 100, refers to the tip to keep the room temperature operational amplifier inherent output voltage, according to my measurement this voltage varies greatly with temperature, different magnification Not the same, the higher the magnification, if you do not measure, please keep the default value)
- P03: thermocouple ℃ / MV data (30 ~ 50, step 1, the default value of 41, refers to the thermocouple need to temperature how much voltage was increased by 1mV, according to the type of thermocouple self-calculation, if you do not understand, please keep Defaults)
- P04: temperature adjustment step (0,1,2,5,10 degrees optional, 0 can lock the soldering iron temperature)
- P05: sleep time (how long don’t not move into sleep) (0 ~ 60 minutes, step 1, 0 is to forbidden the sleep function)
- P06: Shutdown time (0 ~ 180 minutes, 0 ~ 30 step 1,30 ~ 180 step 10, 0 is forbidden shutdown function)
- P07: temperature correction (+20 degrees, step 1) (due to NTC resistance in the chassis, the soldering station heat will lead to the detection of NTC temperature higher than room temperature, resulting in high temperature compensation of the thermocouple, soldering iron temperature is not accurate,or other causes the temperature is not accurate.If you set the other parameters are correct value but the temperature is still high or low, you can use this parameter correction.For example, to detect the displayed soldering iron temperature is 20 degrees higher than the actual value of this parameter Set to 20)
- P08: wake mode (0,1, 0 in the shutdown mode can be rotated the encoder and also can shake the handle to wake up, 1 can only rotate the encoder wake up (Note: press the encoder can not wake up, can only rotate) )
- P09: temperature increase mode to increase the temperature to adjustable (20 degrees to 100 degrees adjustable, adjust the pace of 10 degrees)
- P10: temperature to increase the duration to adjustable (adjustment range of 10 seconds to 250 seconds, adjust the step 5 seconds)
- P11: Parameter setting mode Auto save parameter and return to heating mode Function to active time adjustable (range 4 seconds to 60 seconds)
Installed Note:
- 1. Strictly reference shop tutorials, well insulated and grounded against static electricity.
- 2. Before power test, carefully check the wiring is correct, whether Weld and short, full power test machine after confirmation.
- 3. connect 12-24V DC, if received more than 20V power supply,2017 new style product don't need to remove anything
- 4. When you configure the power supply voltage and current requirements themselves refer to the following table:
Power (third column) is determined by the voltage (first column), as long as the current reaches the minimum current (second column).
Measuring Machine normal, lights and display status:
- 1. Unplugged T12 tip, turn the light flashed off, show SER, 1 seconds after the display 500.
- 2. T12 plug tip, boot light uniform flashing, indicating rapid heating from room temperature generally show the set temperature to rise, approaching the set temperature, strobe lights. Indicator is not flashing or intermittent flashes, indicating that the tip temperature reaches the set temperature or alternating temperature compensation.
When measuring machines on display digital bounce questions:
Because with the new T12 tip, the tip inside the heater did not burnt, it will be just a little jump start with warm, generally do not need special treatment, the natural use of 1-2 days basically not bounce up. If you need effective immediately, the general recommendations of the temperature to 350 ?-380 ?while heating to the point of tin iron head, burning off after 4-5 minutes, until the tip to cool before you can reboot! (1 no action can be repeated 2-3 times)
case
see github

BUY